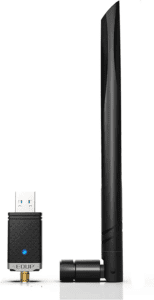
TP-Link AC600 USB WiFi Adapter for PC (Archer T2U Plus)-

TP-Link AC600 USB WiFi Adapter for PC – Wireless Network Adapter for desktop. The ARRIS SURFboard SB8200 DOCSIS 3.1 is the first cable modem to take advantage of the new IEEE standard for gigabit Internet service, and it’s up to 32X faster than DOCSIS 3.0; devices! The SB8200 supports download speeds of up to 8 Gbps and upload speeds of up to 1 Gbps when paired with a compatible router (not included). Plus, you can manage your home network via an intuitive.
features of TP-Link AC600 USB WiFi Adapter
- This adapter supports the 802.11ac standard and provides speeds of up to 433Mbps.
- It also includes a detachable antenna for better range and performance. Additionally, this adapter is compatible with both Windows and macOS.
- Overall, the TP-Link AC600 USB WiFi Adapter for PC is an excellent option for anyone looking to improve their computer’s wireless performance.
- It’s easy to set up, provides excellent speeds, and is compatible with Windows and macOS.
How to Use TP-Link AC600 WiFi Adapter in Ubuntu 15.10
Are you searching for the best TP-Link Archer T2U plus compatible device for your Ubuntu 15.10 operating system? If yes, then you have come to the right place.
The TP-Link Archer T2U plus compatible device with its 2.4GHz and 5GHz dual-band technology will provide you with the best connection to the internet in your house or office. It will also allow you to switch between two wireless networks within your house.
The TP-Link Archer T2U plus compatible device has an LED indicator that will tell you if the device is connected to a wireless network. This is very useful when your device is in your pocket, and you need to switch the wireless network quickly.
The TP-Link Archer T2U plus the compatible device will allow you to connect to the internet via WLAN, Bluetooth and USB ports. This article will discuss installing and using the TP-Link Archer T2U plus compatible devices in Ubuntu 15.10 operating system.
Pre-requisites:
You must download the required drivers to connect the TP-Link Archer T2U plus compatible device to your computer. So, you must ensure that you have installed all the prerequisites before starting the installation process.
1. Download and install the TP-Link Archer T2U plus compatible device driver
To install the TP-Link Archer T2U plus compatible device driver, you must download the driver from the device’s official website. After downloading the driver, unzip the zip file and copy the extracted file to the desktop.
Now open a terminal and enter the following command to check if the driver is correctly installed:
lsusb
If the output of the command is similar to the image below, you will see that the driver is successfully installed.
If you don’t see any output of the above command, then you will have to reinstall the driver.
You can check the version of the driver by entering the following command:
lsusb -l
If you want to know which version of the TP-Link Archer T2U plus compatible device driver you are using, then enter the following command:
uname -r
To know the name of the TP-Link Archer T2U plus compatible device driver, enter the following command:
lsmod | grep 8187
If the command’s output is similar to the image below, you will know that the driver is installed.
2. Connect the TP-Link Archer T2U plus compatible device to your computer
You will need an ethernet cable and the TP-Link Archer T2U plus a compatible device using a wired connection. You will need the TP-Link Archer T2U plus compatible device using a wireless connection.
To connect the TP-Link Archer T2U plus compatible device to your computer’s Ethernet port, you.